on
Hugo + Github Pages
Hugo + GitHub Pages
If you want to make a website for yourself or your business, but don’t know much about writing code, this blog post is for you. In this post, I hope to:
Communicate the reasons why I believe Hugo is an excellent, user friendly, and powerful piece of software to create your website, and the reasons why GitHub Pages is a great place to host it
Share some of the many tutorials available to help inform first-time website designers
Make the path forward easier for you, by sharing ten insights and tips about building a website with Hugo and hosting it through GitHub Pages
Expectations
Before you go further, I want to make sure that you have a realistic mindset. Many sources will claim they can help you make a website in 5 minutes or less. Those claims might be true, but the website created in 5 minutes will be far from a completed product. If you want to design and produce a website via the methods discussed in this post, and you have absolutely no prior coding experience, expect a time investment of approximately 25 hours and about $12 per year. In return, you will have a fully functioning easily modified website with a pertinent domain name. If you put in the time to create an awesome design, you will also have something that authentically represents you. And I think that’s a pretty cool thing to have.
A Bit About Hugo
If you’re still interested, let’s start off by discussing Hugo. Hugo is an open-source static site generator. This means the Hugo software will help the user to develop a static website, or a website with pages that do not change based on the viewer’s actions and external data. To better understand the difference between a static and dynamic site, think about the difference between Wikipedia and Facebook. In Wikipedia, the user’s actions have no effect on the content of the pages, whereas in Facebook, the user’s actions can dictate how a page appears and what content fills the page. Hugo will help you to create a static website to serve content like Wikipedia. Through open-source user contributions, Hugo also contains a large collection of themes for many different types of websites. These are very handy for allowing a first-time website developer to create content with aesthetically-pleasing structure. To make the website development process simple, Hugo also separates the user from the source code of the website via markdown files (.md). Simply put, the developer only needs to make changes to these markdown files, and the Hugo ‘compiler’ will place the desired content into the webpage. Finally, Hugo is completely free to use and is a simple download with most major operating systems (macOS, Ubuntu, Windows, etc.).
A Bit more about GitHub Pages
GitHub Pages is a system that allows users to host a personal website and as many project websites as desired. GitHub Pages hosts the website out of a GitHub Repository, which is an online stored codebase. This structure makes it easy to change your website’s content by simply pushing new content to your online repository. GitHub Pages is widely used and has excellent documentation to help you with any issues you might encounter. They even have a whole post dedicated to hosting Hugo sites on GitHub Pages. Finally, the whole system is free to use, and if you take a liking to website development, you can host as many other project sites as you desire. With all the background covered, lets get started building the site.
Necessary Software and Helpful Tutorials
Various programs will be used in the creation of your website. These programs include
- Terminal/Command Prompt, for moving throughout your directories and working with Git
- Although programmers might consider these programs to be intuitive, it can be helpful to understand basic commands in the terminal. I recommend this basic tutorial to gain familiarity with commands in the Terminal/Command Prompt.
- Hugo, to build your website
- You can install Hugo by following these steps. You will also need to pick a Hugo Theme for your website, which you can find at the link. I recommend the following tutorial for learning some fundamentals about how Hugo generates a site from your markdown data, and how you can modify the default thematic content.
- Git, to clone your content to a repository, allowing hosting by GitHub Pages
- You can download Git here, and I would also recommend watching this tutorial to learn the basic Git commands in the Terminal/Command prompt.
- Markdown Editor, to modify the markdown files and see how content will be rendered on your site
- I recommend Sublime text editor, but most markdown editors will do the job. The purpose of the editor is to give you syntax highlighting, to help you visualize how your markdown text will look when it is rendered, and to help you avoid common markdown typos/bugs.
In addition to this basic list, you may need to download programs like HomeBrew on MacOS or Chocolatey on Windows to obtain a package manager for the Hugo program.
I know there’s been a lot of content presented thus far. But that’s the last tutorial I will recommend, and I hope that you will read through the following section before you get started building your own site. The next and final section of this post will present ten tips that I wish I knew prior to building my website. I hope these tips will speed up and take the pain out of your website development process.
Helpful Hints for Website Development
If you don’t understand a term, don’t understand a program, or are running into bugs with your code, Google it! Even experienced programmers will need to check online to learn the syntax for a command or to help debug their code. One of the best things about programming is the wealth of free online resources to help with all manner of projects. Take advantage of these resources throughout your website development project.
If you’re new to coding, pick and download a Hugo Theme that has lots of support. You want to do this to so that (i) there will be adequate online documentation for that theme, and (ii) the theme is (hopefully) actively maintained by contributors. One way to tell if themes have lots of support is by the stars in their GitHub repository, as shown in the top right corner of the below figure, and by the date the files were last modified. If you click the Download link next to a Hugo Theme, it should take you to the theme’s repository so you can check on the theme’s popularity.

Markdown files are simple files that allow you some amount of control over how your content is rendered on the webpage. You can bold certain words, create lists, italicize, and make lots of other valuable textual appearance changes in markdown. A quick cheatsheet for basic formatting in markdown is available here. I’d suggest you look it over and try to use some of the formatting to improve the content appearance in your website.
Embrace the terminal/command line. Although its textual user interface isn’t initially the most friendly, it is a powerful and simple tool to execute programs quickly. Even a bit of knowledge about terminal functionality and frequently used commands goes a long way toward understanding your issues and how you might fix them. You will also likely be using Git through your terminal/command line, so its important to be familiar with the basic Git commands in the terminal/command line. Some basic terminal and Git commands are shown below.
Hugo has a useful way of employing themes and of allowing you to make changes to your themes. When you create your website, via the command
hugo new site <rootfolder>, hugo will put necessary project files into the website’s main folder, which we’ll call root from here out. Then, when you download a theme, you will download it into the root/themes folder. This themes will have a similar folder structure as your root folder. When it renders your site, Hugo will look in your root folder/directory for needed files, and if it doesn’t find the files in your root folder, it will look in the themes folder. This means that, if you want to modify files from your theme (which you will, to make the website personal), you should Copy the files you want to change into your root folder. Copy theconfig.toml(orconfig.yaml) file from the themes folder into the root folder, and copy any other files you want to change into your root folder with the same nested folders. For example, if you want to change the file academic.css in themes>layouts>partials>css, you will need to put the modified file into root>layouts>partials>css, creating the intermediate folders if necessary. Then, when the site is generated, Hugo will refer to your modified file, and if you would ever like to reset the file to default, simply delete your copied file and the original in the themes folder will be used instead.Read through the entire
config.yaml(orconfig.toml) file that you copied from your themes folder into your root folder. The config file dictates many of the most important features of your website, and its important that you know all of the options you have when it comes to style and content. By picking an appropriate theme and optimizing the website style inconfig.toml, you can have a website that is authentically “you”.Pay attention to the file indexes and references. The generator will look for content (i.e. markdown files) in certain places. If you change the name of a file, or change the link to a file (for example,
file = "home/content/pages.md"->"home/content/project.md"), the generator will likely fail to render the content. So if you decide to change the name of a file, which is totally fine and might be necessary, just make sure that you change the references to that file in your config file.When you are happy with your site’s appearance, you will want to publish it. I recommend you do this via GitHub Pages. When deploying the site, you will have the option to create either a User Page, or a Project Page. If this is your first time using GitHub Pages, I recommend you create a user page, as it will make the site mapping slightly more logical and you will hopefully avoid some indexing errors.
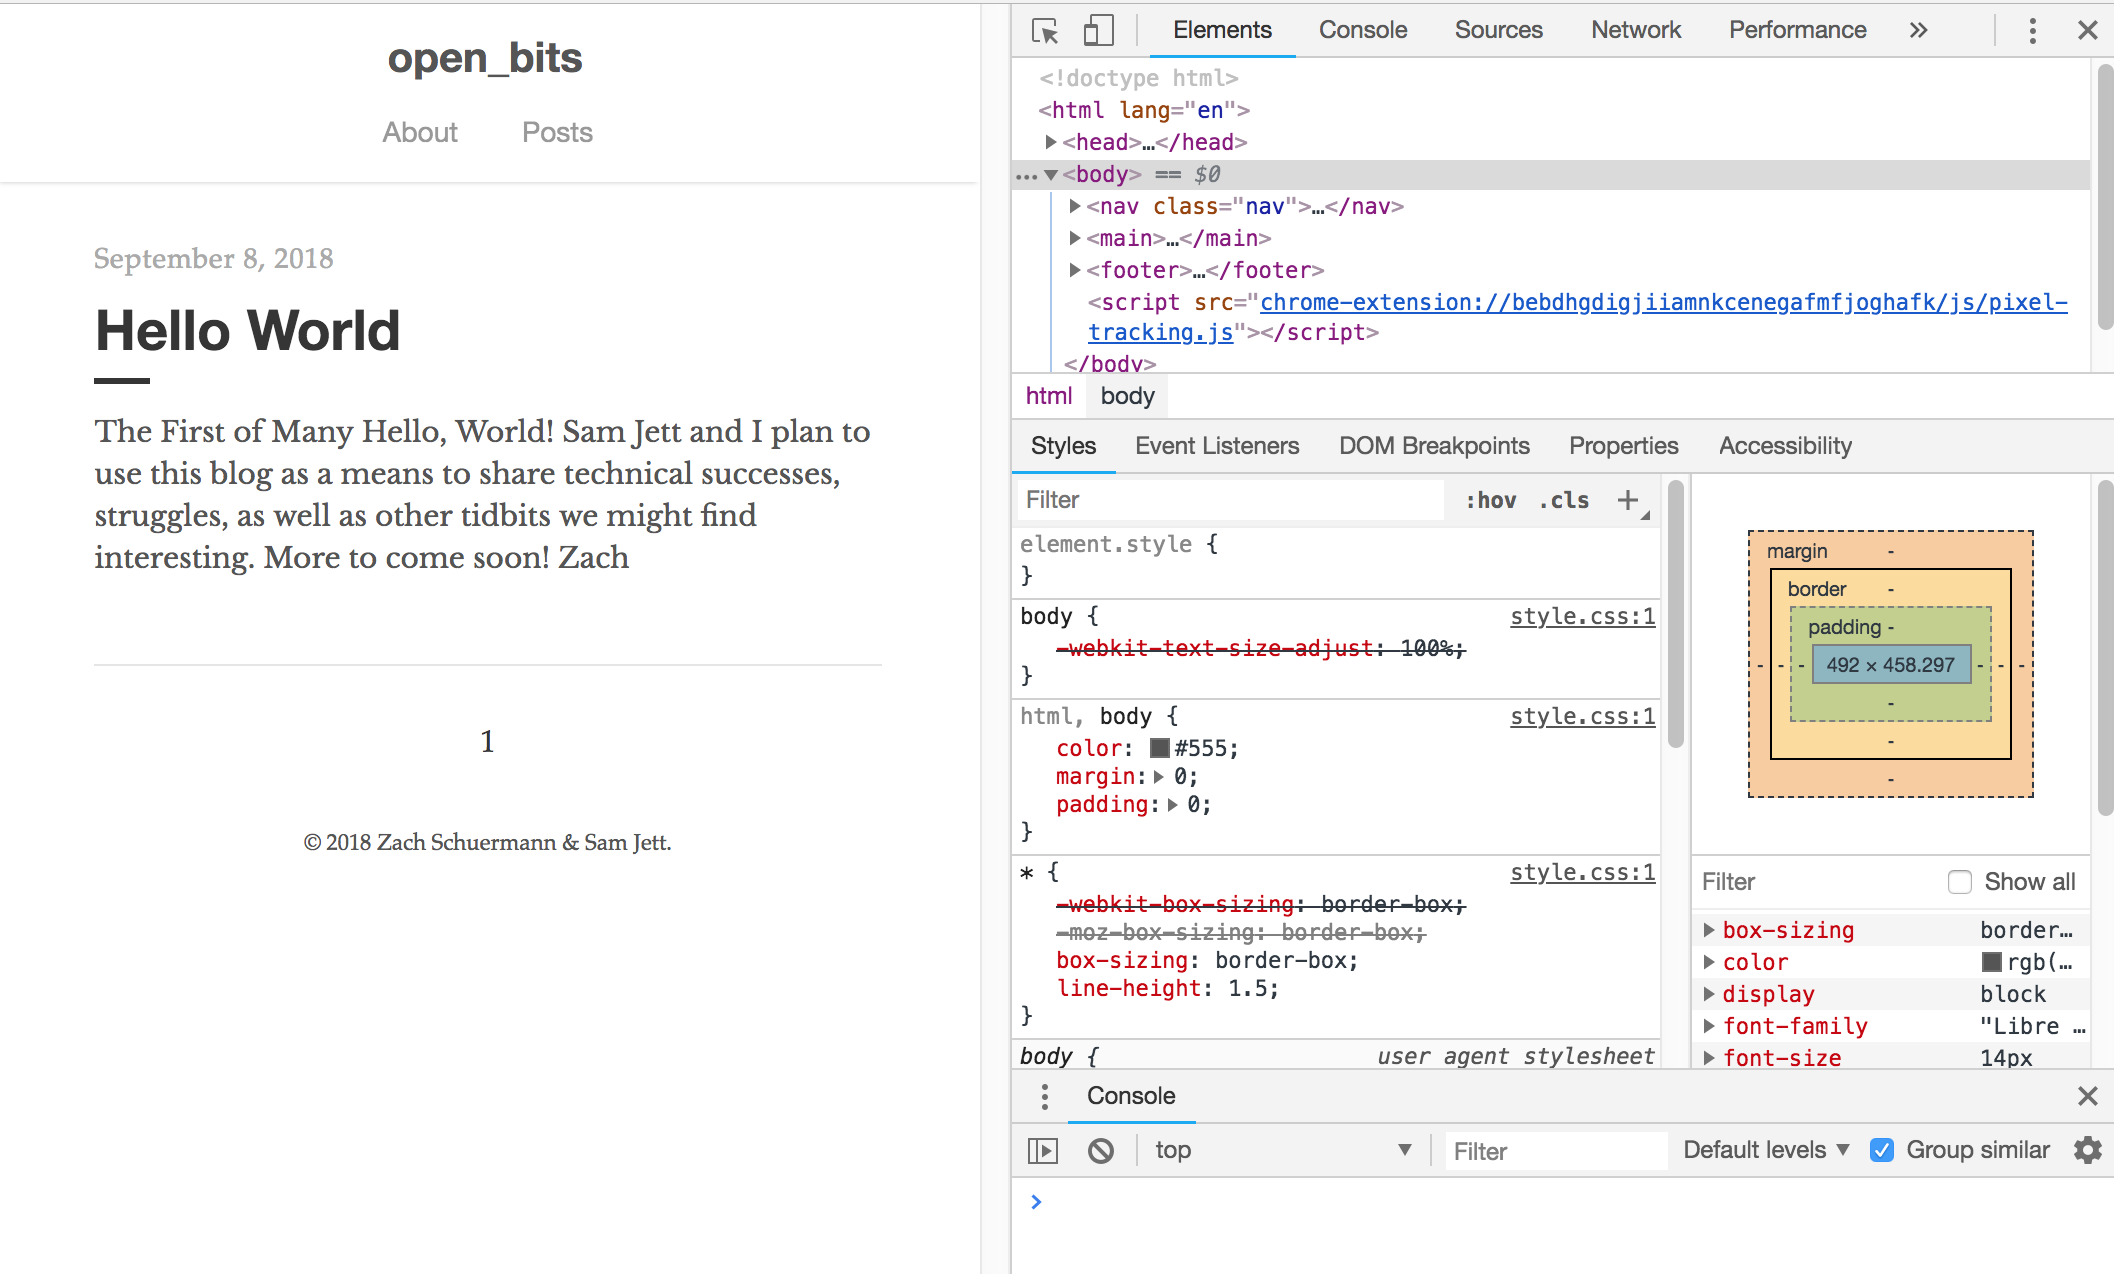
When you are viewing your published site, especially if it is not rendering correctly, open it through Google Chrome. If you are having problems, the Google Chrome developer tools can be helpful for understanding what the website is trying to render vs. what you want it to render. An example of the tools use while visiting our blog is shown below.
When you have your website up and running with GitHub Pages, changing the domain name to something more desirable is easy. Just head over to Google Domain Names (or any other domain name registrar) and purchase a domain name. You can then enter this domain name into your GitHub Pages account, verify with both Google and GitHub Pages that you own the domain name and can host there, and then the website will be accessible via your desired domain name.
(Optional) Set up Google Tracking Analytics. This is a cool service by Google that shows who is visiting your site, what city the visitors are coming from, how long they’ve been visiting for, and, if it is a commercial site, how you can keep the visitors coming back. Its fun to view and easy to setup once you have your website operational.
That’s all I have. I wish you all the best with your website development adventure!